> ## Documentation Index
> Fetch the complete documentation index at: https://docs.turbodev.ai/llms.txt
> Use this file to discover all available pages before exploring further.
# Generic Webhooks
Generic Webhooks in Turbodev allow you to connect external platforms, applications, or systems with Turbodev and automatically trigger WhatsApp messages based on real-time events.
Using webhooks, you can send automated WhatsApp notifications when events occur in your CRM, website, app, forms, or any third-party system.
This integration enables fully automated messaging without manual intervention.
## What is a Generic Webhook?
A webhook is a unique URL generated by Turbodev that listens for incoming data from external platforms.
When your external system sends data to the Turbodev webhook URL, Turbodev captures the data and triggers the configured workflow automatically.
This allows you to automate:
* Lead notifications
* Order alerts
* Appointment confirmations
* Follow-ups
* Customer communication
## Step-by-Step Guide to Connect Generic Webhook in Turbodev
Follow these steps to create and connect a webhook.
### Step 1: Open Generic Webhooks Integration
1. Log in to your **Turbodev dashboard**
2. Go to **Integrations** from the left navigation panel
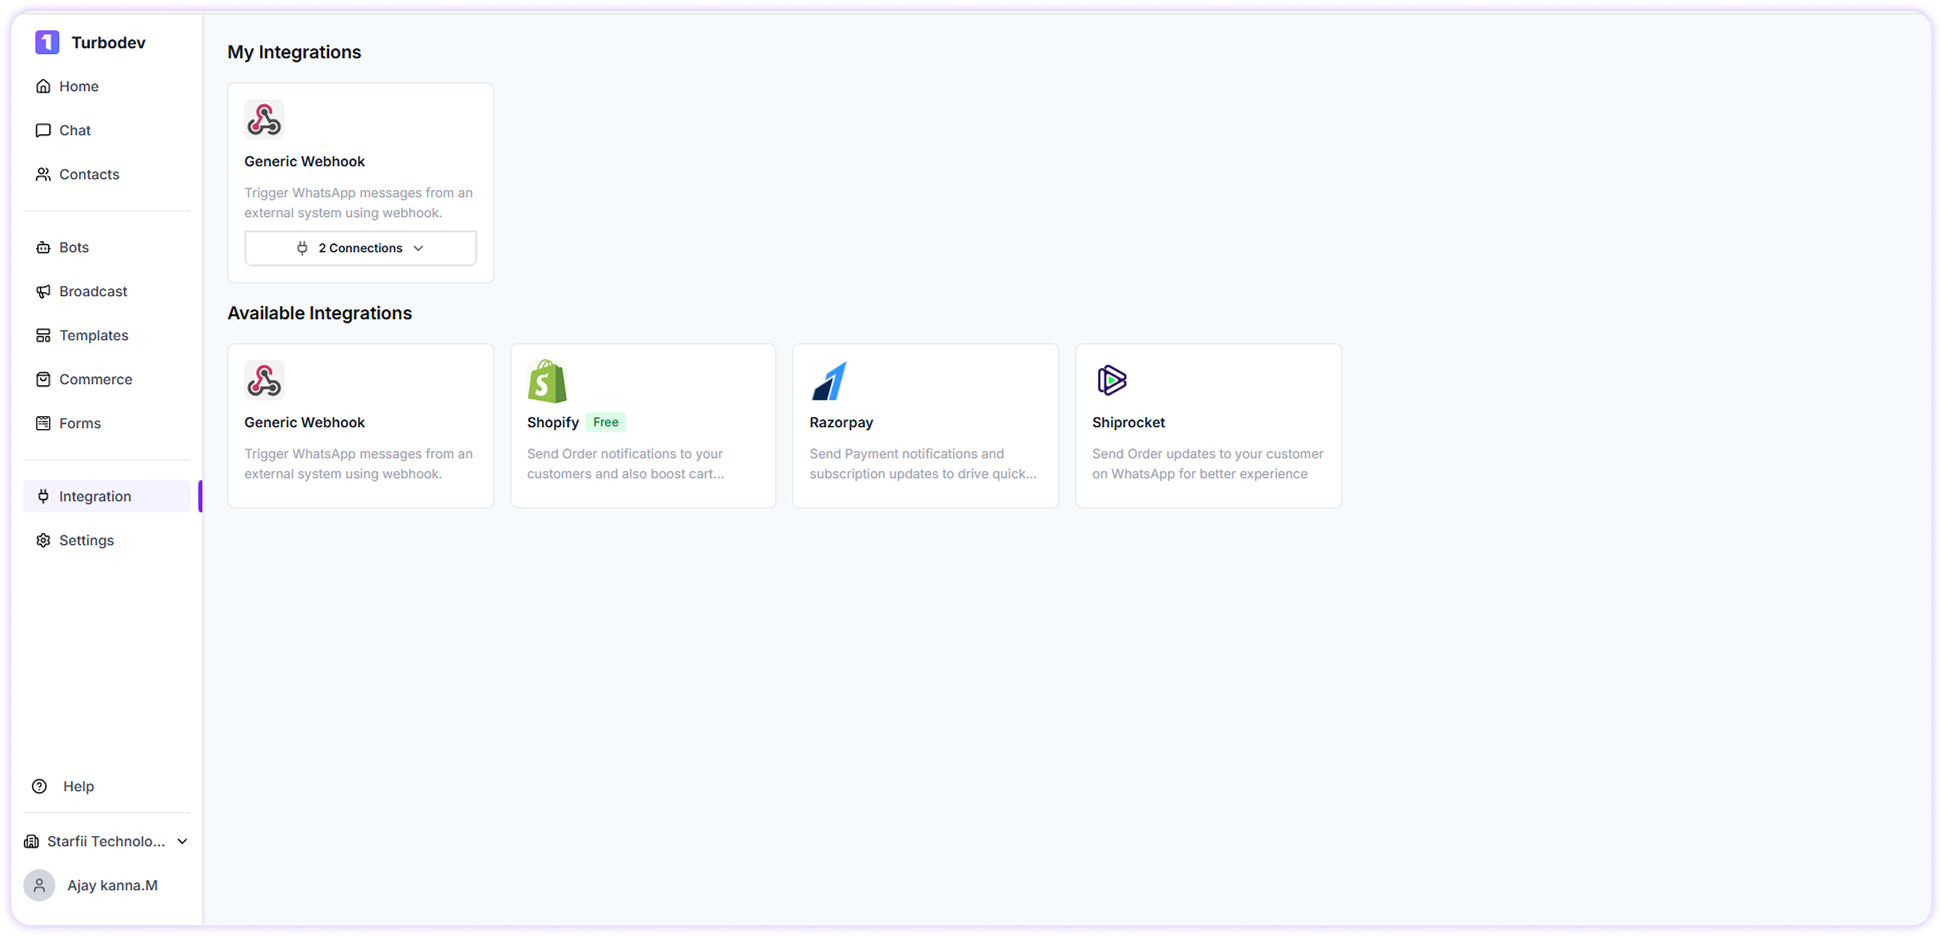 3. Select **Generic Webhooks**
4. Click **Connect**
A setup pop-up will appear.
### Step 2: Enter Webhook Name
In the pop-up window:
1. Enter a **Webhook Name**
3. Select **Generic Webhooks**
4. Click **Connect**
A setup pop-up will appear.
### Step 2: Enter Webhook Name
In the pop-up window:
1. Enter a **Webhook Name**
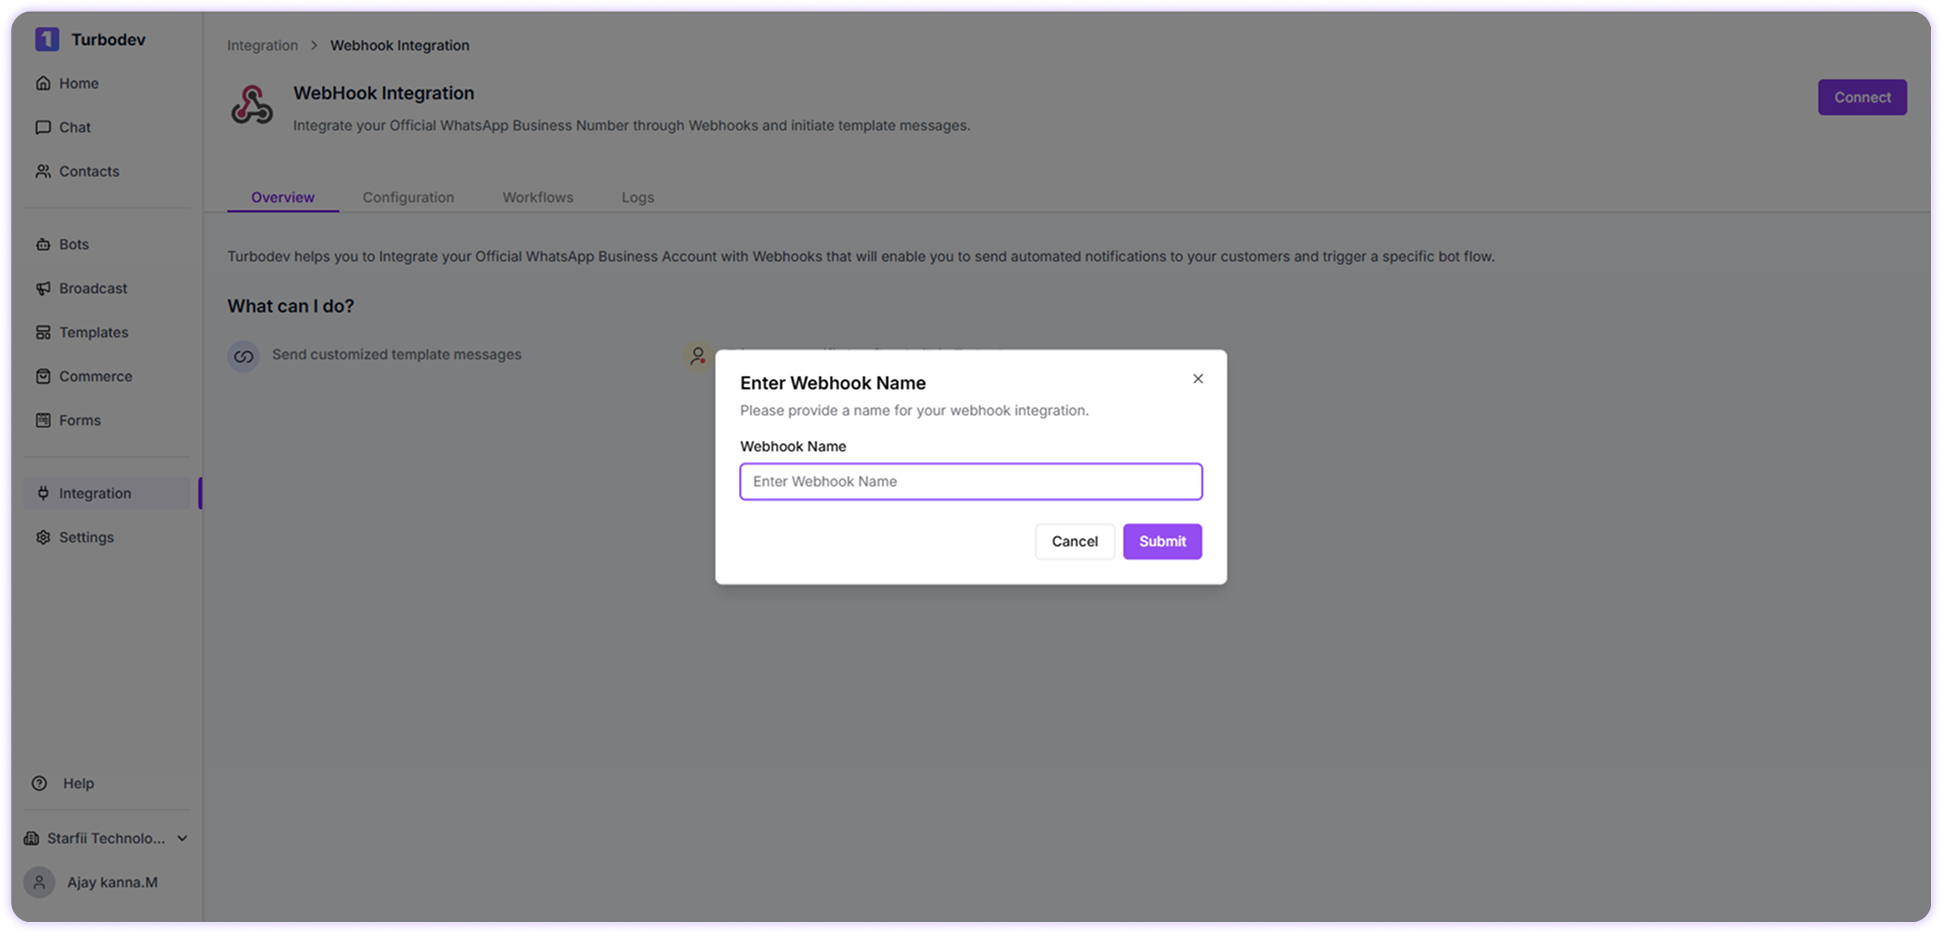 Example:
```
Lead Capture Webhook
```
2. Click **Submit**
The webhook configuration page will open.
### Step 3: Copy Webhook URL
On the configuration page, you will see:
Example:
```
Lead Capture Webhook
```
2. Click **Submit**
The webhook configuration page will open.
### Step 3: Copy Webhook URL
On the configuration page, you will see:
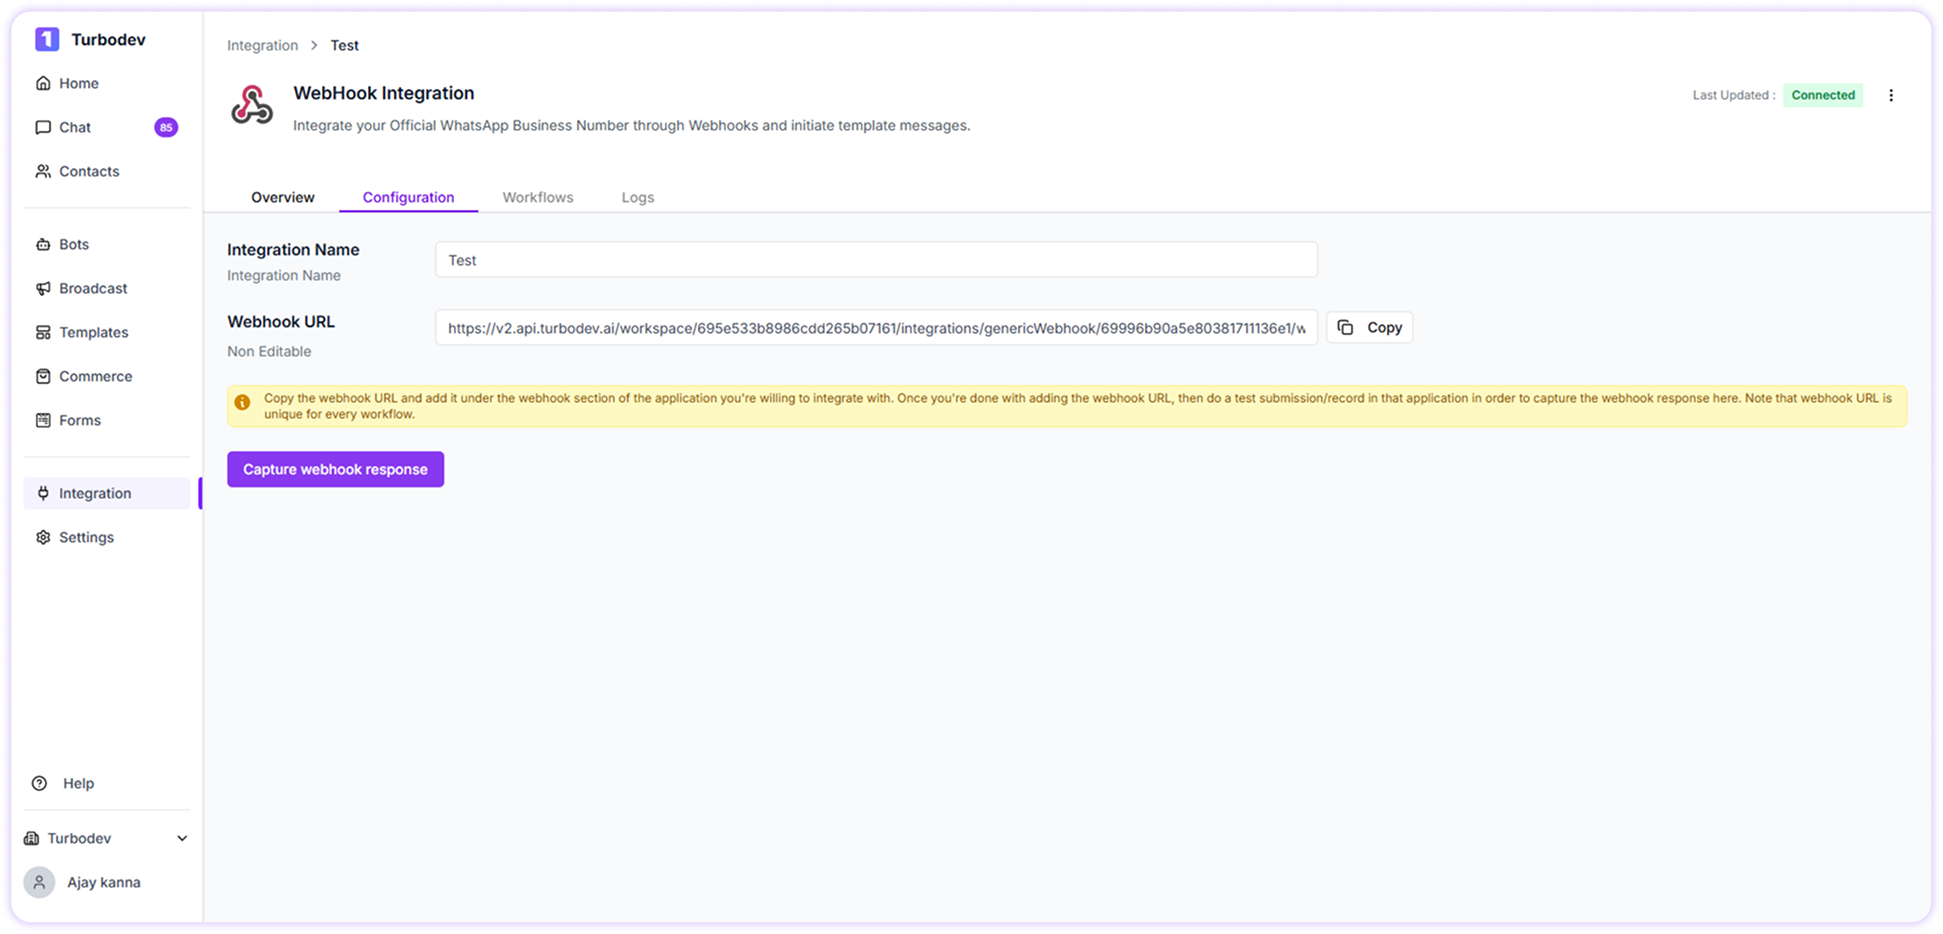 * Integration Name
* Webhook URL
Copy the generated **Webhook URL**
Example:
```
https://api.turbodev.ai/webhook/xxxxx
```
Now paste this webhook URL into your external platform.
You can add this webhook URL in:
* Your website backend
* CRM system
* Lead forms
* Shopify
* Custom applications
* Zapier or automation tools
This allows TurboDev to receive real-time data.
### Step 4: Capture Webhook Response
After adding the webhook URL to your external system:
1. Trigger a test event from your external platform\
(example: submit a form or create a test lead)
2. Return to Turbodev
3. Click: **Capture Webhook Response**
TurboDev will automatically capture the incoming data.
* Integration Name
* Webhook URL
Copy the generated **Webhook URL**
Example:
```
https://api.turbodev.ai/webhook/xxxxx
```
Now paste this webhook URL into your external platform.
You can add this webhook URL in:
* Your website backend
* CRM system
* Lead forms
* Shopify
* Custom applications
* Zapier or automation tools
This allows TurboDev to receive real-time data.
### Step 4: Capture Webhook Response
After adding the webhook URL to your external system:
1. Trigger a test event from your external platform\
(example: submit a form or create a test lead)
2. Return to Turbodev
3. Click: **Capture Webhook Response**
TurboDev will automatically capture the incoming data.
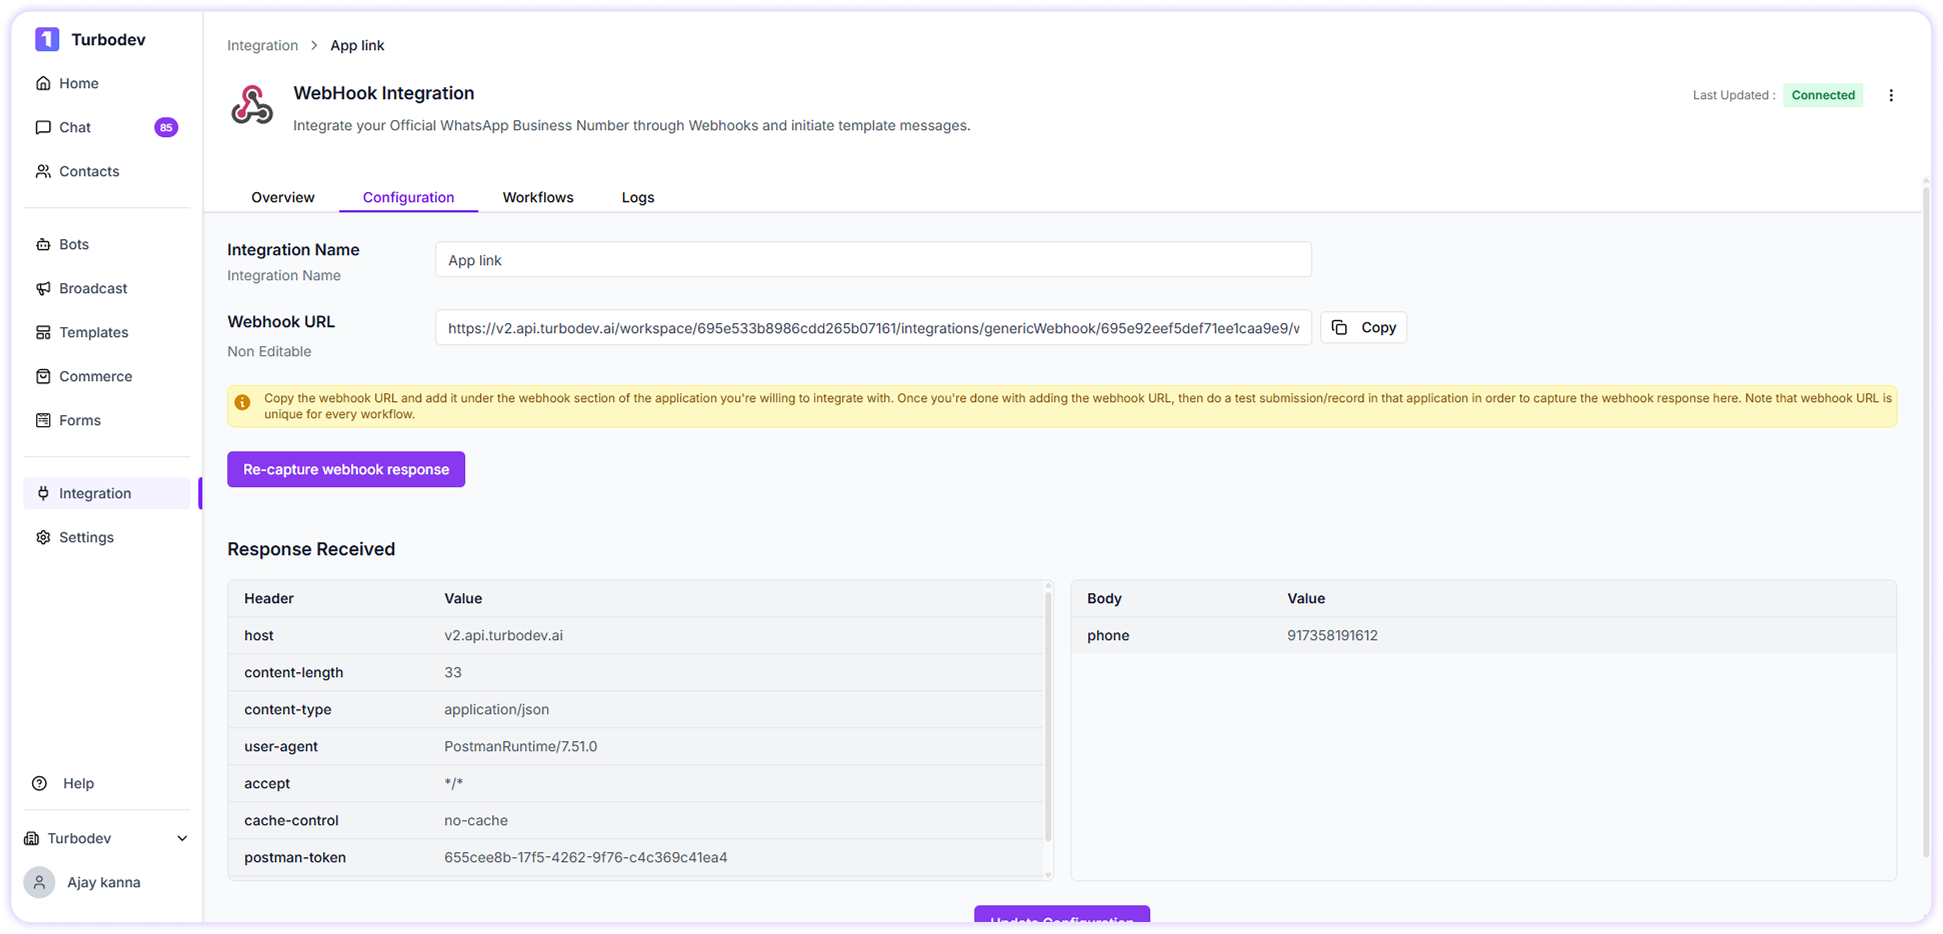 Once the response is captured successfully, workflow creation will be unlocked.
### Step 5: Create Webhook Workflow
Click:**Create Workflow**
Now configure the workflow details.
### Workflow Details Configuration
Enter the following:
### Workflow name
Enter the workflow name.
Example:
```
New Lead WhatsApp Notification
```
### Recipient Name Mapping
Once the response is captured successfully, workflow creation will be unlocked.
### Step 5: Create Webhook Workflow
Click:**Create Workflow**
Now configure the workflow details.
### Workflow Details Configuration
Enter the following:
### Workflow name
Enter the workflow name.
Example:
```
New Lead WhatsApp Notification
```
### Recipient Name Mapping
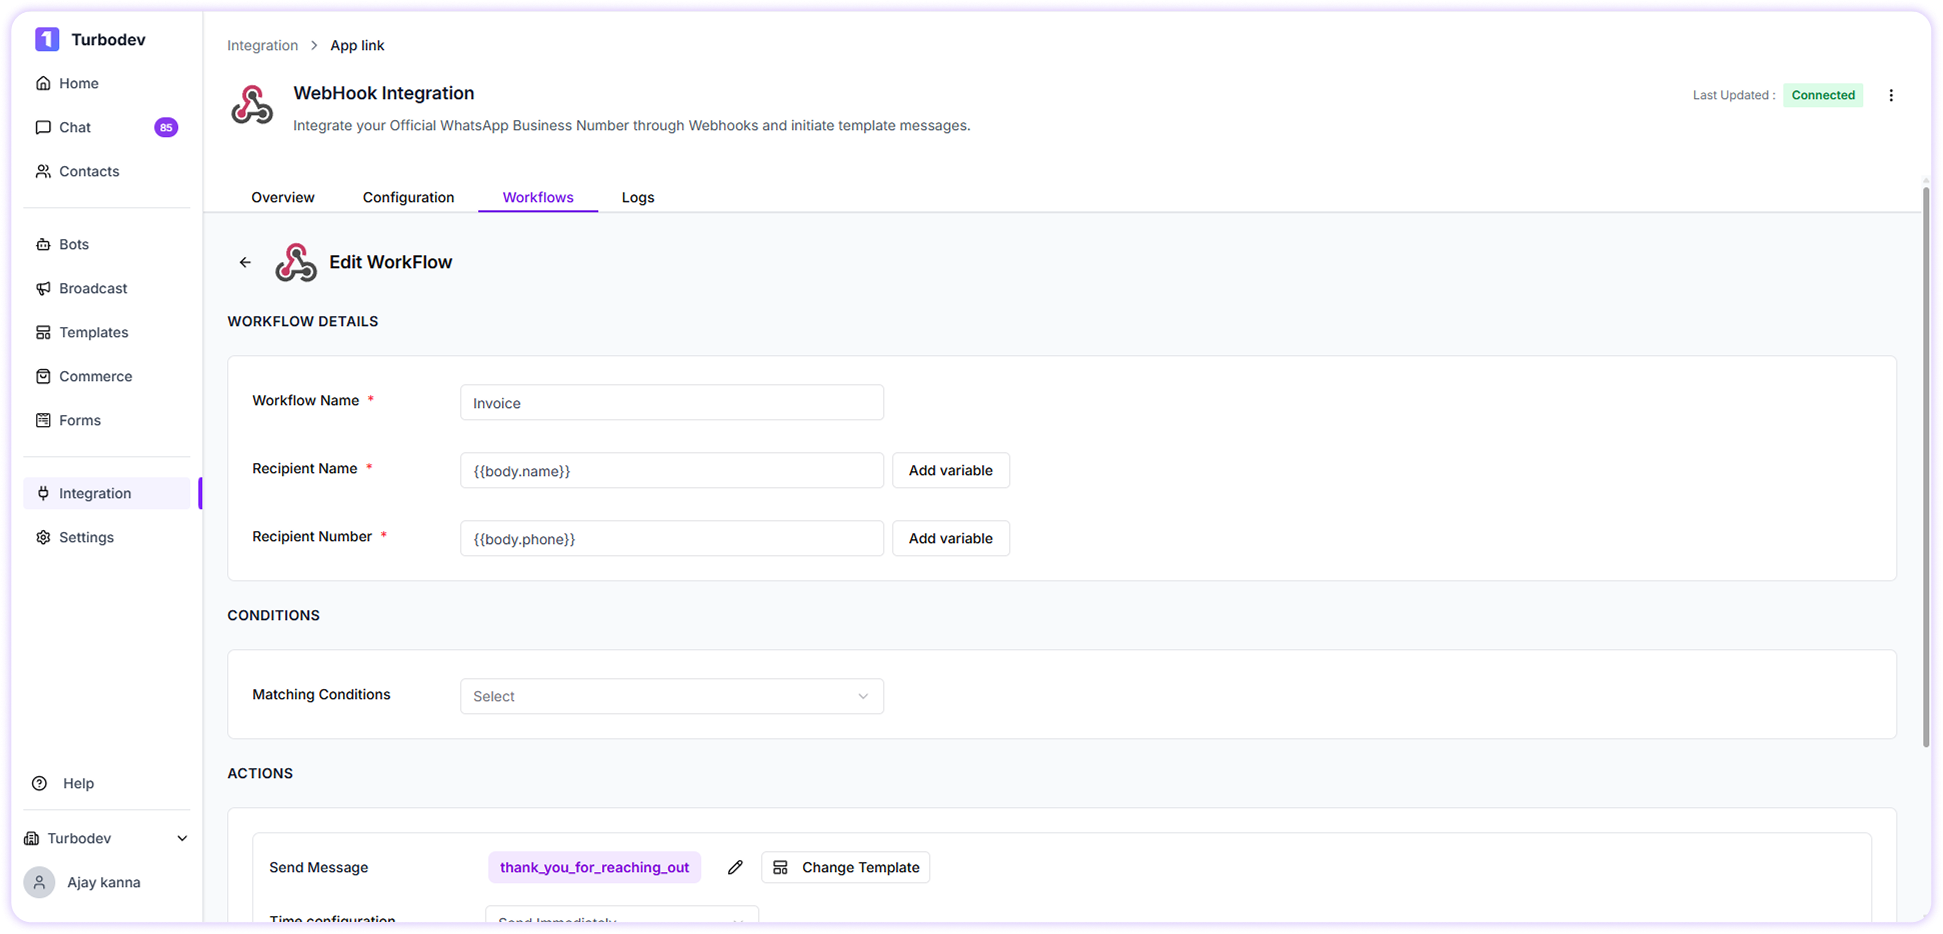 1. Click **Add Variable**
2. Select the field that contains the customer name from webhook response
3. Map it as **Recipient Name**
This ensures messages are personalized.
### Recipient Number Mapping
1. Click **Add Variable**
2. Select the field that contains the phone number
3. Map it as **Recipient Number**
The phone number must include the country code followed by the 10-digit mobile number, without using the "+" symbol. Example: 917358XXXXXX
This tells TurboDev where to send the WhatsApp message.
### Step 6: Add Conditions (Optional)
TurboDev allows you to add conditions before sending messages.
1. Click **Add Variable**
2. Select the field that contains the customer name from webhook response
3. Map it as **Recipient Name**
This ensures messages are personalized.
### Recipient Number Mapping
1. Click **Add Variable**
2. Select the field that contains the phone number
3. Map it as **Recipient Number**
The phone number must include the country code followed by the 10-digit mobile number, without using the "+" symbol. Example: 917358XXXXXX
This tells TurboDev where to send the WhatsApp message.
### Step 6: Add Conditions (Optional)
TurboDev allows you to add conditions before sending messages.
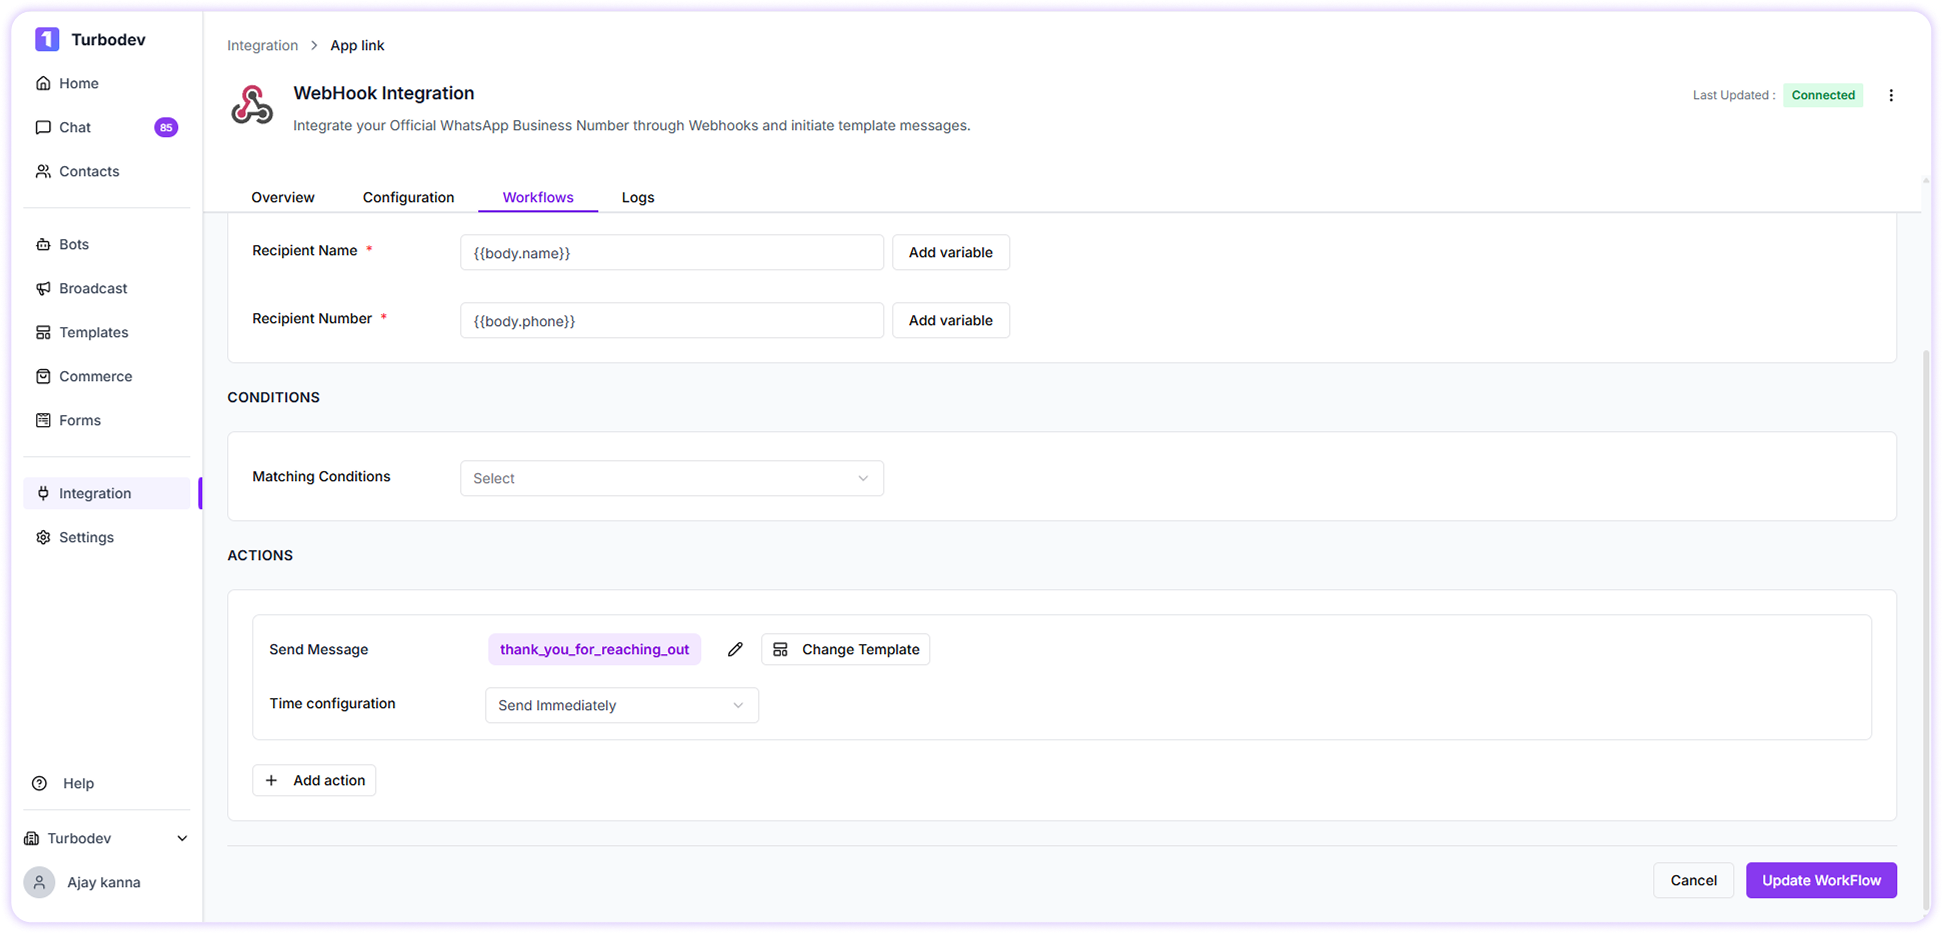 ### Step 7: Add Action – Send WhatsApp Message
Click: **Add Action**
Select: **Send WhatsApp Message**
Now:
1. Click **Select Template**
2. Choose a WhatsApp template that is already approved by Meta
3. Confirm template selection
Example template:
> Hi name, thank you for your interest. Our team will contact you shortly.
### Step 8: Create and Activate Workflow
Click: **Update Workflow**
Your webhook workflow is now active.
TurboDev will automatically send WhatsApp messages whenever webhook data is received.
## How the Webhook Workflow Works
Workflow process:
1. External system sends data to Turbodev webhook URL
2. TurboDev captures the data
3. Workflow is triggered automatically
4. WhatsApp message is sent to the mapped phone number
5. Message delivery status is tracked in TurboDev
This happens instantly in real time.
## How to Check Webhook and Message Status
You can monitor webhook activity and message delivery.
Go to:
### Step 7: Add Action – Send WhatsApp Message
Click: **Add Action**
Select: **Send WhatsApp Message**
Now:
1. Click **Select Template**
2. Choose a WhatsApp template that is already approved by Meta
3. Confirm template selection
Example template:
> Hi name, thank you for your interest. Our team will contact you shortly.
### Step 8: Create and Activate Workflow
Click: **Update Workflow**
Your webhook workflow is now active.
TurboDev will automatically send WhatsApp messages whenever webhook data is received.
## How the Webhook Workflow Works
Workflow process:
1. External system sends data to Turbodev webhook URL
2. TurboDev captures the data
3. Workflow is triggered automatically
4. WhatsApp message is sent to the mapped phone number
5. Message delivery status is tracked in TurboDev
This happens instantly in real time.
## How to Check Webhook and Message Status
You can monitor webhook activity and message delivery.
Go to:
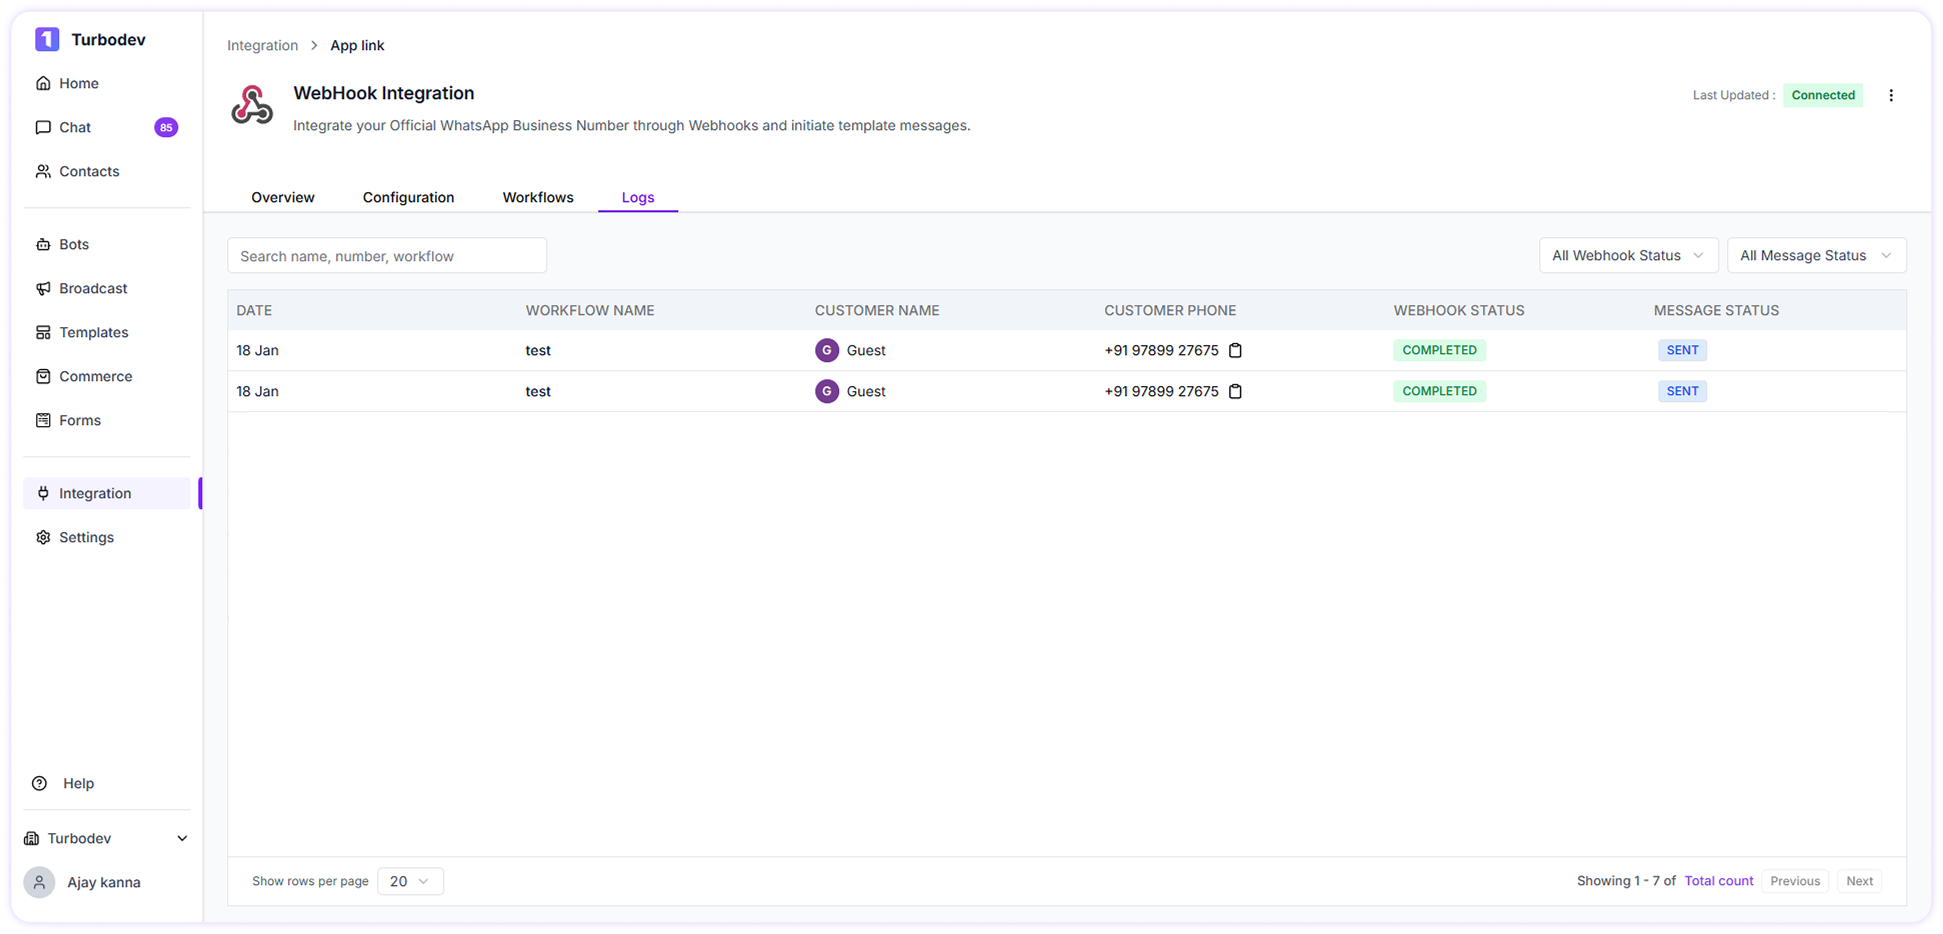 * Webhook Logs → Check webhook response status
* Message Logs → Check message sent, delivered, or failed status
This helps you track automation performance.
* Webhook Logs → Check webhook response status
* Message Logs → Check message sent, delivered, or failed status
This helps you track automation performance.